One of the reasons why Clepher is such a popular chatbot creation and marketing suite is the fact we integrate the most third-party tools natively. But, there’s another BIG reason why people are flogging over to Clepher… It’s because we have the BIGGEST library of Done For You chatbot templates! Yup, some cool feats indeed! And frankly? We love boasting about it! I mean, how could we not? Back in 2020, we’ve released a new native integration on a weekly basis. Plus, we released 3 new chatbot templates every Friday!
However, at the end of 2020, I asked the team the following question:
“How can we provide even more value to our dear Clepher customers?”
You can probably imagine that our Zoom call was just oozing with inspiration, it brought tons of cool chatbot ideas! And, just to be on the safe side, we’ve written every single idea down. Yet, for some reason, one idea, in particular, kept circling back. We took this as a sign and started to work out this idea first.
Introducing “Done For You” Chatbot Flows
Yup. After bringing you the most elaborate and coolest Chatbot Templates, we’ve now taken on the challenge to do the same for Chatbot Flows. Exciting, right? Let’s dive in!
First things first, though, for those of you reading this article that don’t know, Clepher works with a Visual Builder, we baptized it as the Flow Composer. In short, you use this nifty tool to map out the conversations of your chatbot. And, Done For You Flows refers to Pre-made Flows, basically, already mapped out conversations and automations, which you’re able to import, edit and use on your own pages as you see fit.
With that out of the way, with the Done For You Flows we’re aiming to release on a weekly basis, we not only take out more of the guesswork for you – you know, as we did with chatbot templates… But, we hope you also get a better understanding of what is possible with Clepher, the integrations, and chatbots as a whole.
We think it will help you get the most out of your chatbots for your business. With that said, this means that today marks the start of Done For You Flows!
The Language Translator Chatbot Flow:
The Start of the Language Translator Chatbot Flow
The first Done For You (DFY) Messenger Chatbot Flow we like to introduce you to is the Language Translator Flow. See, subscribers who engage with this chatbot are able to translate words, phrases, and paragraphs to the language of their choice. What is also cool is that subscribers can also input non-English languages to translate to other languages.
That said, in this article, you discover the Language Translator DFY Flow at Clepher. You will get to see how it works, how it is set up, which Flow Composer Cards are used, and many other cool details.
The Language Translator Chatbot Benefits:
See, more often than not, you will find yourself in conversations with foreign individuals speaking a language you do not understand. And being a business owner, entrepreneur, marketer, or anyone else that deals with others talking with people from various parts of the globe… It would be a shame if you were not able to understand each other.
You may even find yourself reading materials in a different language. Or, writing papers, letters, and articles in a foreign language. And, of course, other online resources and dictionaries can help. But, isn’t automating the process – having a translator on the ready – the best way to move forward?
I mean, just imagine selling apparel on a global scale… How cool would it be if you have a Language Translation feature built-into your chatbot? To have the chatbot translate their pre and post-sales questions on their own through your chatbot?
Some of the benefits of the Language Translator Chatbot:
- Translate words, phrases, and sentences. Clepher’s Language Translator Flow can be used for translating words, phrases, and sentences, plus it offers various other benefits. For instance, it can be used for writing articles and letters in a foreign language, or for preparing a discussion with a foreign business partner.
- Learn various languages. The Language Translator Chatbot Flow adds a Language translating Flow to your chatbot. This chatbot covers multiple languages worldwide. This language translator can translate various foreign languages. They include any language from English to Spanish, and from Arabic to Zulu. It will depend on the input fields you will be having. It can translate anything from basic expressions to complicated sentences.
- Save time, energy, and resources. With your personal translator, that’s available 24/7 for both you and your chatbot users, you save a bunch of time, energy, and resources. You will never have to scan through the pages of the dictionary once more.
The Language Translator Chatbot Flow in Clepher
In this section of the blog article, we share the Clepher’s Language Translator Flow content for a language translator. We thought it would be great to show you how this Flow works, so you also get a better understanding of how Flows work within the Clepher platform. Moreover, this part of the article will also include information on the cards you can use and customize.
Savvy as you are, you know that Clepher has the Flow Composer where you build out your chatbot. Basically, it’s where you automate messages and sequences – the beating heart of your chatbot. We have over 20 different cards you can choose from, including text, images, carousels, and much more. You simply drag cards from the left and release them on the white canvas on the right to start building your chatbot. Then you further customize those cards, by typing your message, click save, and connect them with each other using the connector. It’s as easy as that! IF you’d like to see a video about this, this video explains it (and other automation features) in great detail.
Overview Of The Language Translator Chatbot Flow
Here’s how the Language Translator Flow looks like in Messenger. Yup, just a single Flow – working with one of the coolest integrations; the Google Sheet integration.
The Language Translator Chatbot Flow in Clepher
By importing the Language Translator Chatbot Flow, you essentially already made it live in your chatbot. Congrats! Because your chatbot can now translate words, phrases, and sentences to your preferred language. For instance, it can translate English to Italian or vice-versa. Or, translate from German to Japanese, etc.
The Language Translator Flow as seen in Messenger
So far so good? Cool! Perhaps, check it out yourself… As I feel you may want to immerse yourself first before we lay it out. Check the demo of the Langauge Translator Chatbot here.
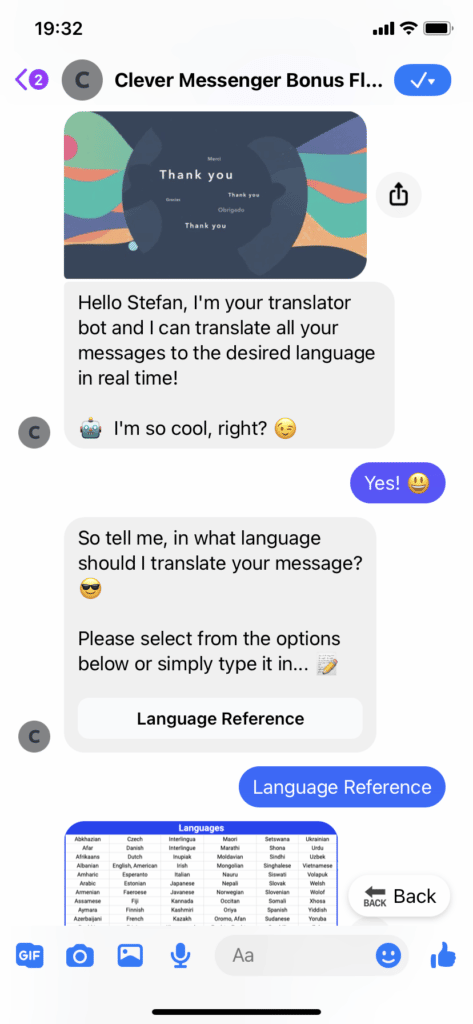
As you can see, the chatbot starts with its introduction, a message with a Quick Reply. The message says “Hello Firstname, I’m your translator bot and I can translate all your messages to the desired language in real-time! ![]() I’m so cool, right?
I’m so cool, right? ![]() “.
“.
As the user clicks “Yes,” the bot will ask what language they want to translate. Included in this message is the button that says, “Language Reference”, plus this message has clickable Quick Replies attached to it with preset languages. These presets can be changed within Clepher, of course. Upon clicking a language, they will be directed to the next step. They may also see the rest of the languages the bot can translate by clicking “Language Reference.”
In the next example, I’ve chosen to type the word “Dutch” as I want to translate a word into the Dutch language.
See the image below for visual reference:

Typing “Dutch” into the Chatbot on Messenger
After choosing the language, the bot will ask you to type the message you want to be translated. For instance, “Good Morning” in Dutch. It will present the language translation. In this case, it is “Goedemorgen”
See the image below for visual reference:
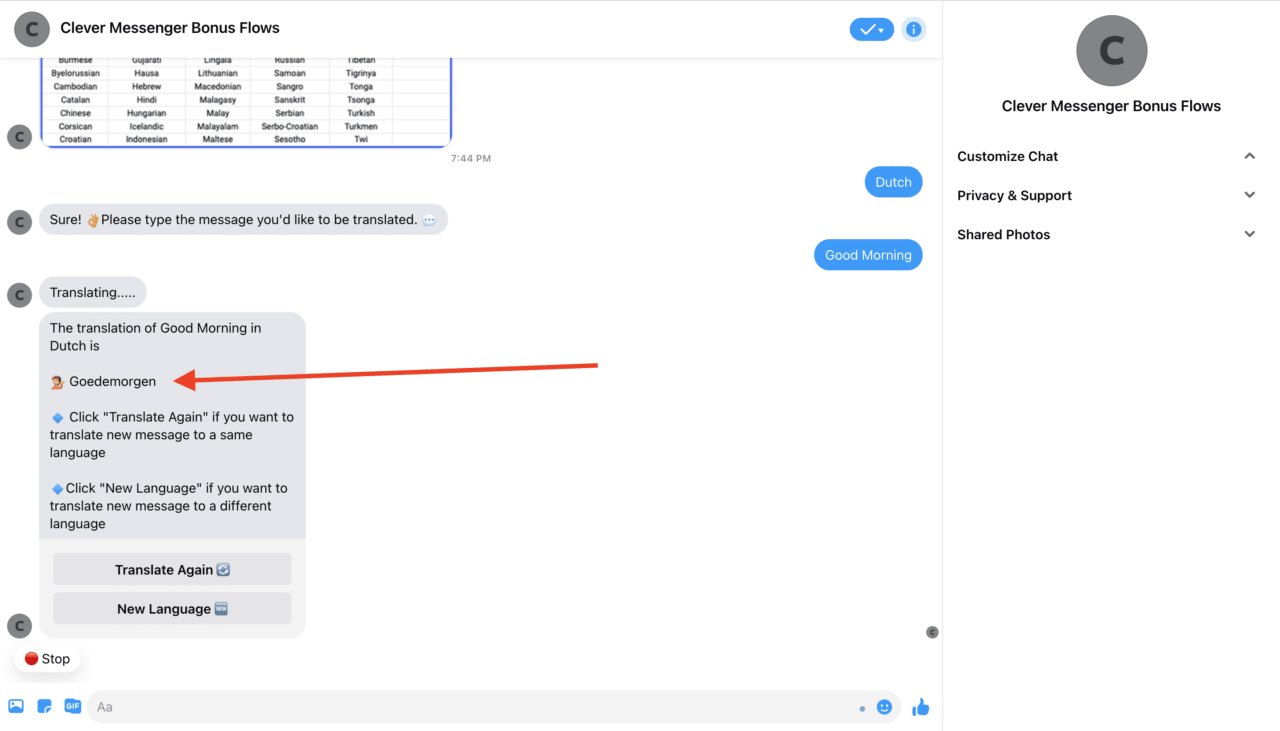
A successful translation using the chatbot!
Then, there will be two options: “Translate Again” and “New Language.” We can choose “Translate Again” if we want to translate another English word, or phrase, to Dutch. If so, you will be redirected to the translation part again… Then, you can also choose a new language when you click “New Language.”
See the image below for visual reference:
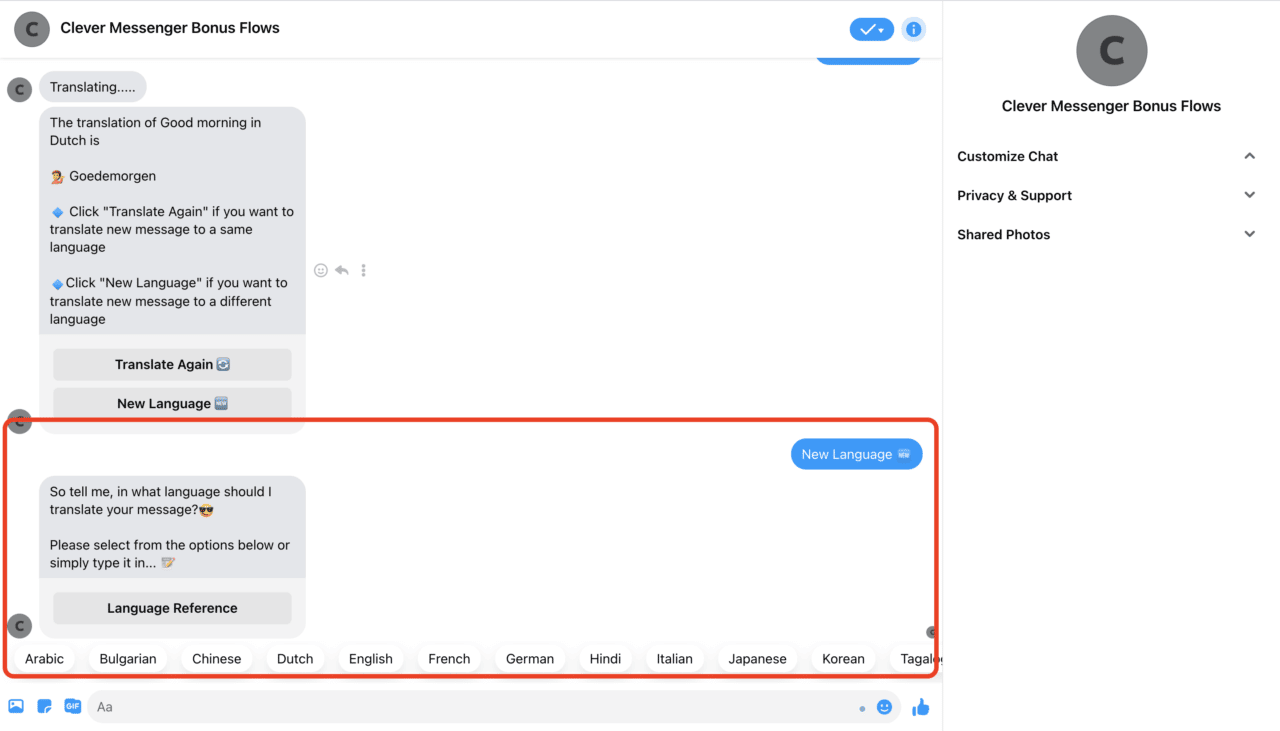
You can choose between many different languages
What’s inside The Language Translator Chatbot Flow?
In this section of the article, we highlight some of the things going on inside this particular Premium Chatbot Flow:
Google Sheets
This Flow uses Google Sheets to help translate languages. So, let us take a look at the Google Sheets setup you should have. There are three tabs. Namely, “NOTES,” “Language,” and “Logs.” The “NOTES” tab contains “Tab Name” as the first column and “Purpose” as the second column. Under the columns are the two tabs, “Language” and “Logs” and details on what they are and do. In short, in “Logs” you find placeholders for formula block processing.
See the image below for visual reference:
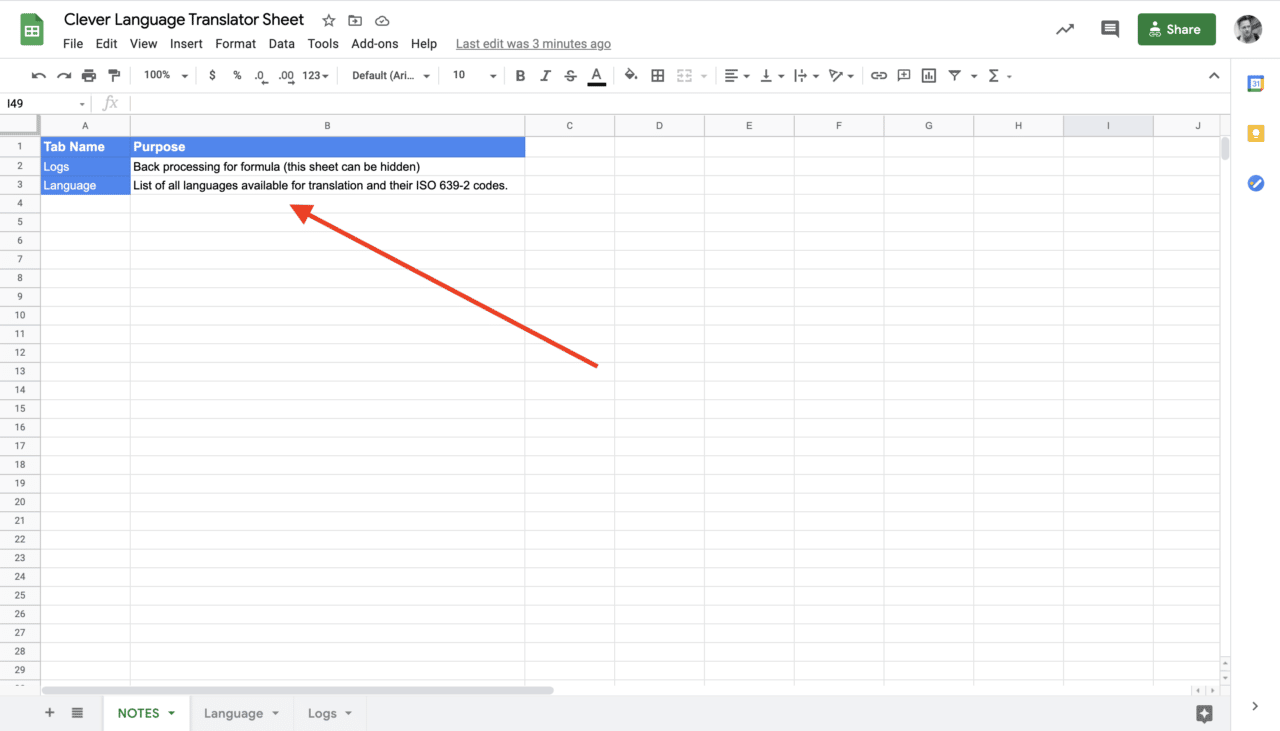
The NOTES Sheet on Google Sheets
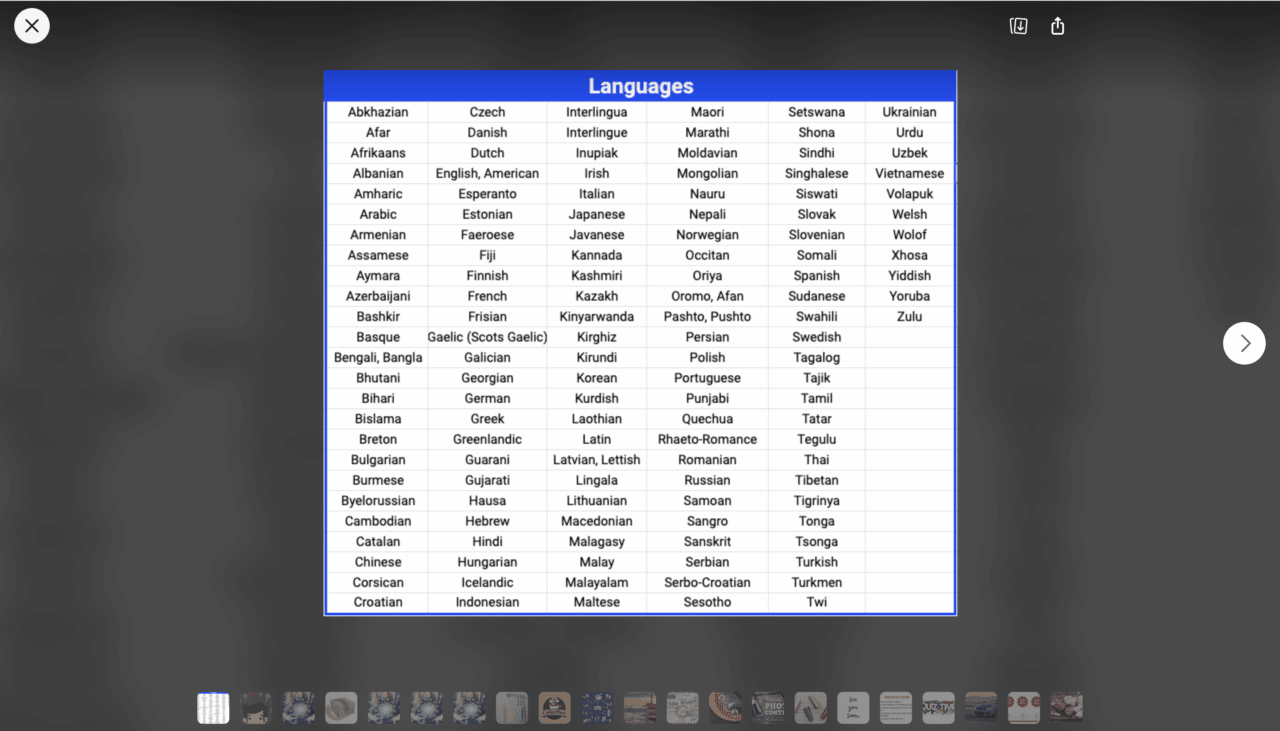
Under “Language”, you find a list of the languages available for translation, as well as their ISO-639-2 codes.
See the image below for visual reference:
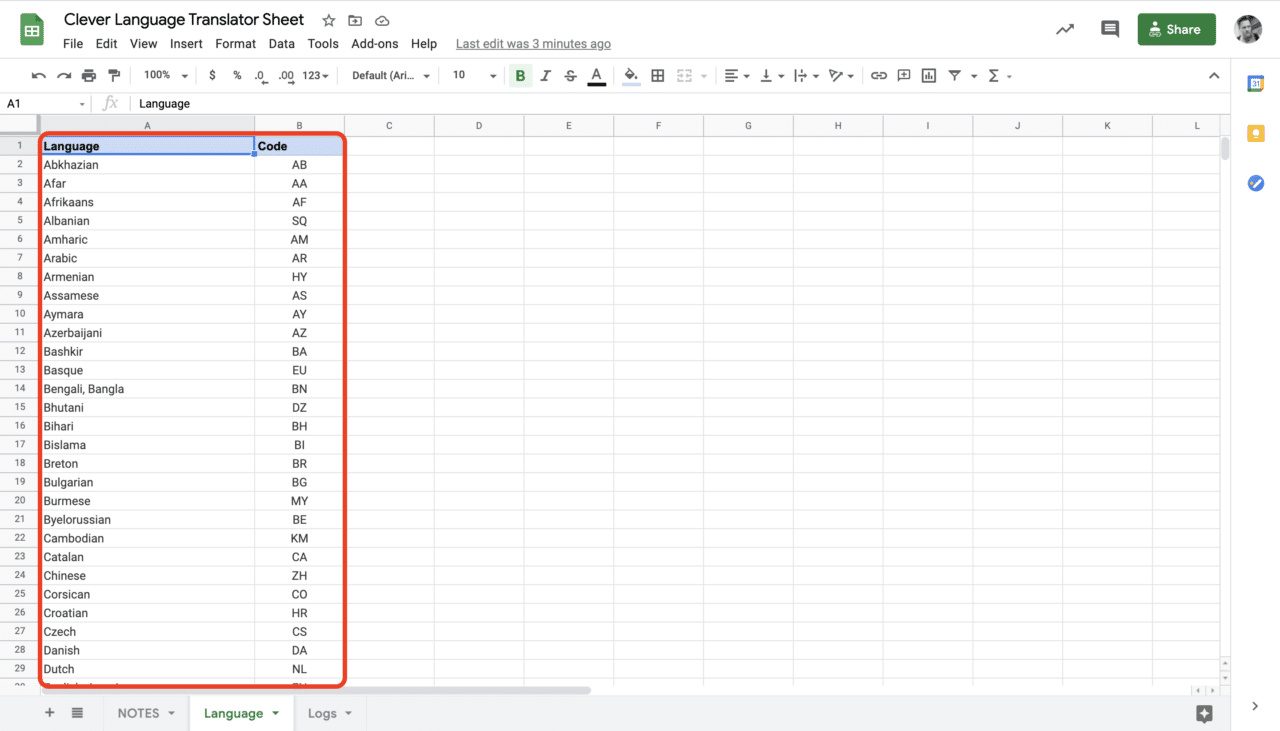
The Language Sheet on Google Sheets
The “Logs” tab has the Messenger ID, Full Name, Message, Language Code, and Translation. This will be entirely based on the input of users using the Flow.
See the image below for visual reference:
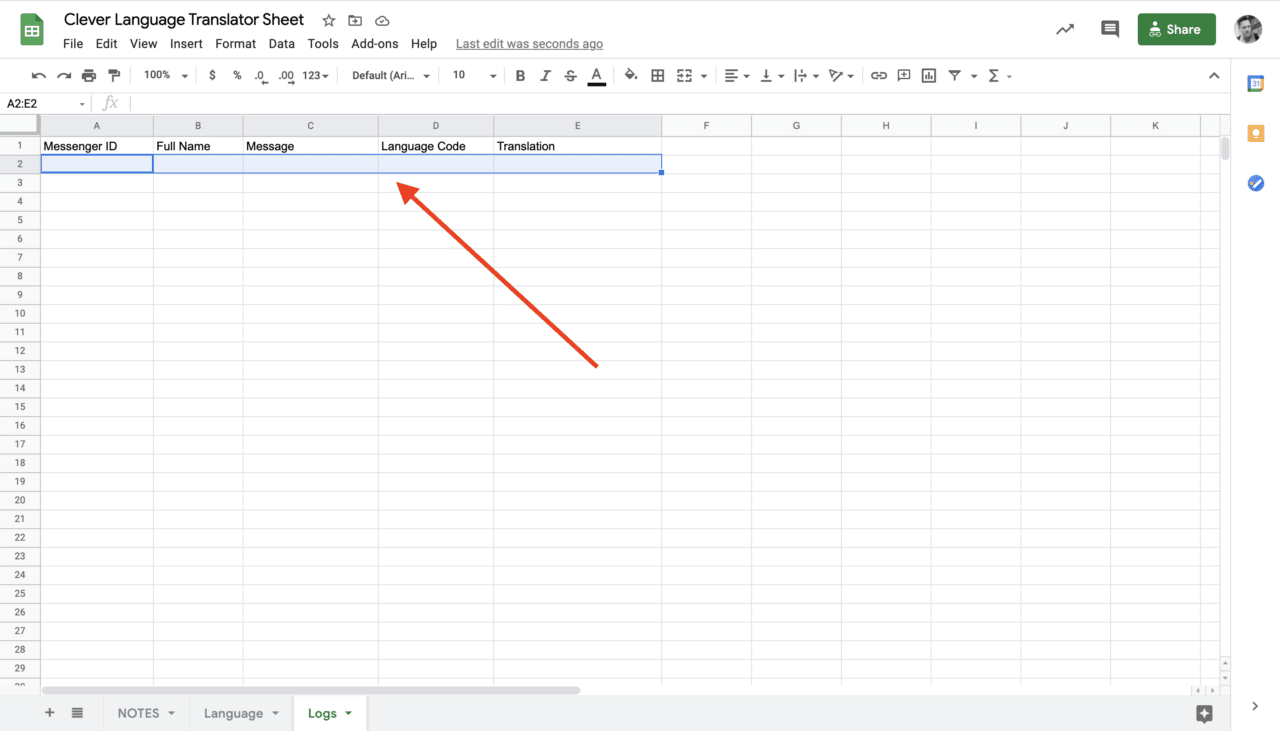
The Logs Sheet on Google Sheets
As a side note, click here to get a copy of the Language Translator Google Sheet. Once on the Google Sheets, first, make a copy, this gives you your own Google Sheet with all the details needed. Plus, it places this spreadsheet in your Google Sheet account, hence giving you the power to edit the sheet, as well as to use this sheet in your integrations in Clepher.
Flow Cards
Of course, each Flow Card is fully customizable. Meaning, if you want to prioritize other languages, or have the chatbot say something different, you can easily edit this inside the Flow Cards. In this specific Flow, you also cards, like the Condition Card, that lead to segmentation.
We used the following cards in the Language Translation Chatbot Flow:
- Action card,
- Image card
- Text card
- Other Information card
- Google Sheets Integration card
- Condition card
For the purpose of this article, we divided the image below into columns. This way, it should be easier for you to refer back to parts of the image once we mention the word column.
Here’s the Language Translator Flow divided into columns:
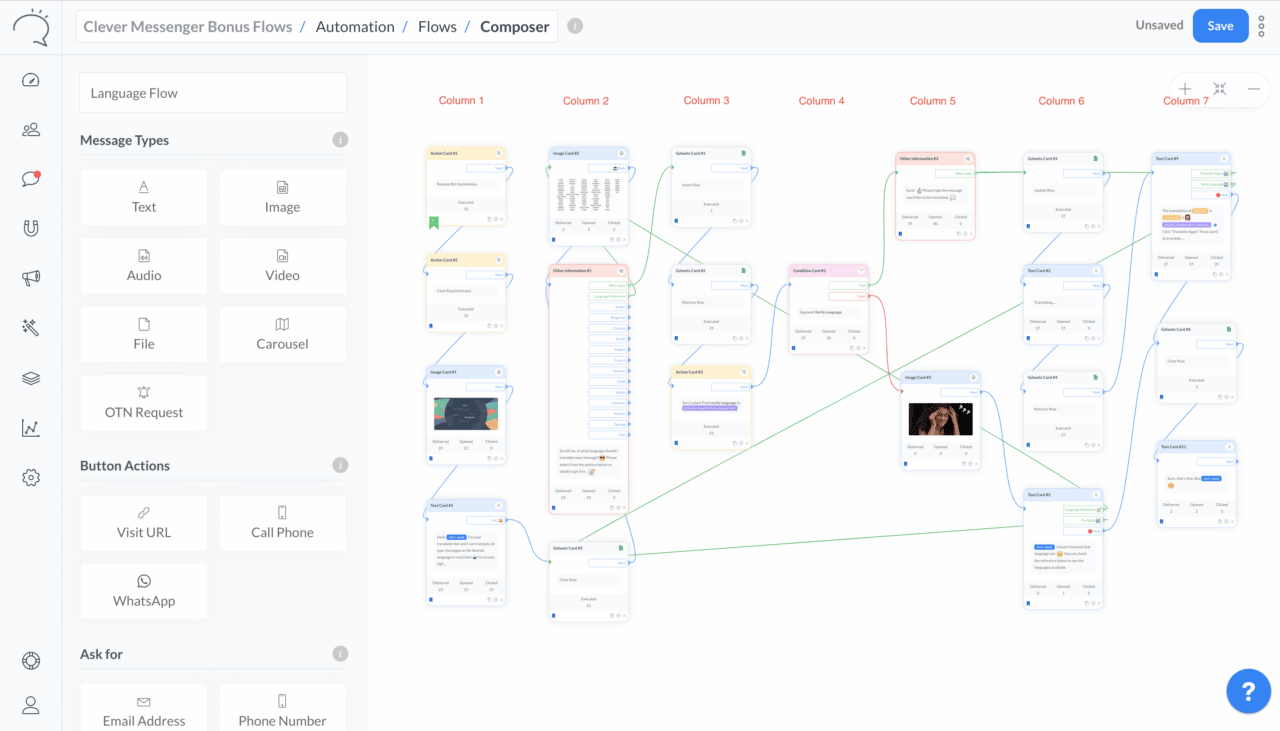
The Language Translator Flow Divided into Columns
The Text card in the first column has the Quick Reply. Once the user types, or clicks the Quick Reply button that says “Yes”, it will go to the Google Sheets card in the 2nd column. The purpose of this is to correct any previous entries of the user in the logs tab. In short, these cards are necessary for this Flow to work, so don’t remove them.
Moreover, the Other Information card in the second column has some of the available languages set as Quick Replies. They include Arabic, Bulgarian, Chinese, and more. It also has the Language Reference button. When this button is clicked, on the Messenger side of things, the user is shown the available languages for translation via the Image Card. You see the Image card up top in column 2.
See the image below for visual reference:
The Image Card of the Flow in Action on Messenger
Once the user chooses a language from the list, in Clepher, the input will be saved in the Custom Field tied to the Other Information Card. Then, after the Google Sheets card on the third column (with the Insert Row) is the Google Sheet card with Retrieve Row. The purpose of this is to retrieve the values from the Logs tab. Then, a Retrieve Row is also used to save the Language Code to a Custom Field. To do this, we use an action card with a Set Custom Field as an action.
The Condition card on the fourth column verifies language segmentation. The segment that it’s checking is called “Verify language”.
Here’s how that Segment looks inside Segmentation:
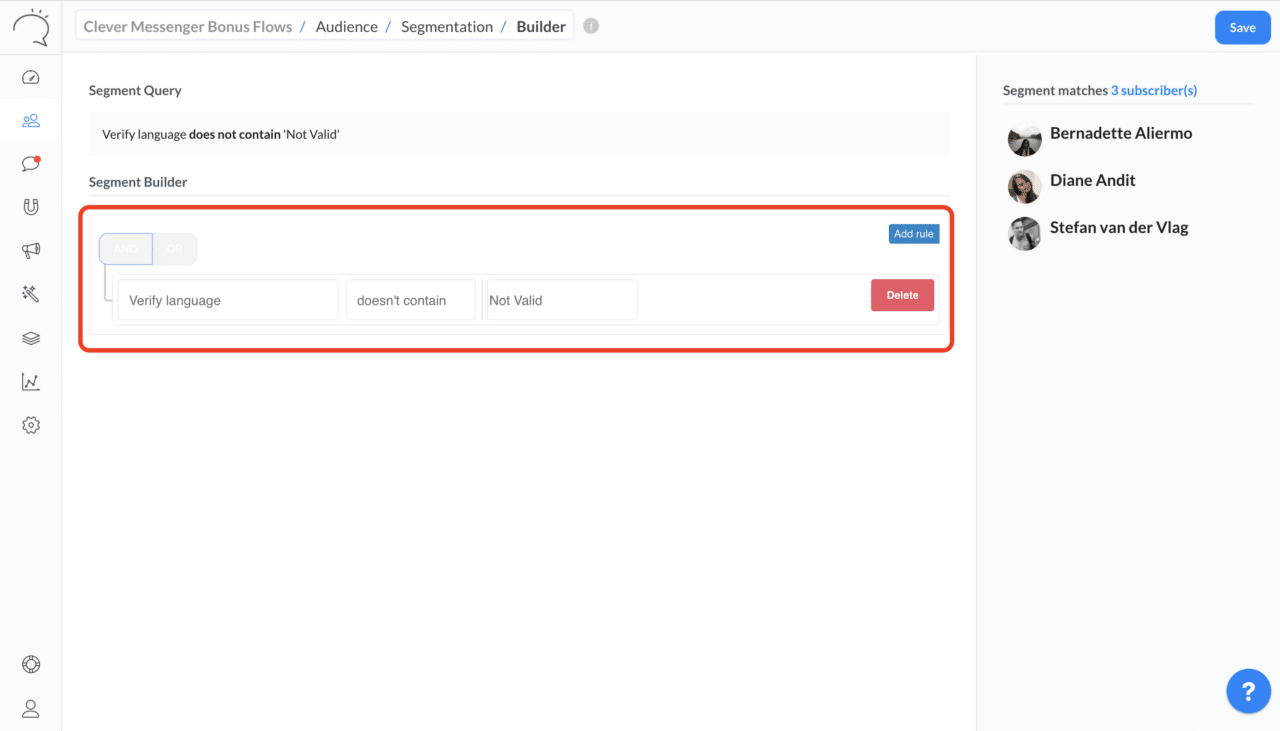
The Segment that’s used for the Condition Card
This segment contains a Custom Field, it has the same name as the segment: “Verify Language”. It has “Not Valid” as a value, and it’s using the “doesn’t contain” parameter. How this works is as follows… If a Custom Field for the user doesn’t contain “Not Valid”, users will be led through the True path. If it does contain “Not Valid”, the user goes through the False path.
Condition Card: TRUE & FALSE Values
The Condition card leads to either the True or False path. In the True path, you can first find the Other Information card that asks the phrase or sentence the user wants to translate. Then, it is followed by the Google Sheet Card with the Update Row action. Opening the settings of this card, you should have Messenger ID as the lookup column and lookup value. “Logs” will still be in the Select Worksheet.
It is vital to take note of the Row section. Messenger ID, Full Name, and Language Code should be locked because we use the Insert Row card with the values already inserted. You will only have to update the Message and Translation fields. The Message should have “Message” in the custom field. Translation will have the Google Translate formula.
The True path also includes the Text card that says “Translating…” Plus, another Retrieve Row Google Sheets card. This retrieves the value from the logs tab. It is followed by a Text card.
If the user chooses “Translate Again,” it will return to the Other Information card. The user should provide a new word or sentence that will be translated. If the user chooses “New Language,” it will return to the Other Information card on the second column of the flow. The user must select another language. At any time, the user can stop, by clicking the “Stop” icon.
For the False path, if the condition is not met, it will just inform the user the bot cannot translate the phrase or sentence. There is also a button when the user selects “translate again,” as they start over the process. Once you complete arranging and creating the Flow, your Google Sheets should have been updated.
Google Sheet Card Settings
Each Flow card has its respective settings to make the Flow work (duh!). It’s important that the settings you specify must be accurate – otherwise, the Flow will stop functioning. Now, luckily, when you Import this Flow or any Flow for that matter… All settings, Custom Fields, Tags, etc., are automatically duplicated. Yup, you don’t have to worry about that. However, the exception to the rule are the Integration cards. See, since we’re using our own Google Sheets integration for this Flow, we’re unable to duplicate the settings. As that would mean sharing API details and other sensitive data as well. As a security measure, we made sure this is technically not possible for any Clepher account.
That’s where this section of the article comes into play. Because this means that some vital parts, that make the chatbot flow work, are missing the moment you import the Flow. This means you need to add those settings to the card manually… Fortunately, this is super easy.
Let’s take a look at the settings used for the Google Sheets cards:
First, make sure you integrated Google Sheets with Clepher, read this Knowledgebase article to see how. When ready, note that there are 6 Google Sheet Card in the Language Translator Chatbot Flow spread out over 4 “columns”.
Here’s that image again, showing the Flow divided into columns:
The Language Translator Flow divided into Columns
Column 2 – Card 1
The first Google Sheet card can be found in Columns 2. First, make sure you select the Integrated Google Sheet account. Under “Select as Action”, choose “Clear Row”. Then, under “Select Spreadsheet” and “Select Worksheet”, make sure you select your spreadsheet you copied over earlier i.e. “Clever Language Translator”, and the worksheet “Logs”. Under Select Lookup Column, pick Messenger ID, and in the LookUp Value, you place the place holder Messenger ID, you do this by picking it from the picker.
Here’s how it should look like:

The Google Sheet Card in the 2nd Column
Column 3 – Card 1
The third column has 2 Google Sheet cards. For the first card, make sure you select the Integrated Google Sheet account. Under “Select as Action”, choose “Insert Row”. Then, under “Select Spreadsheet” and “Select Worksheet”, make sure you select your spreadsheet you copied over earlier i.e. “Clever Language Translator”, and the worksheet “Logs”. Then, under Row, fill out the fields like we did as shown in the image below. Note, it has a formula as well: =IFERROR(VLOOKUP(“*LANGUAGE*”,Language!A:B,2,FALSE),”Not Valid”) – make sure that the first mention of language, capitalized as LANGUAGE is replaced by the Custom Field called LANGUAGE.
Here’s how it should look like:
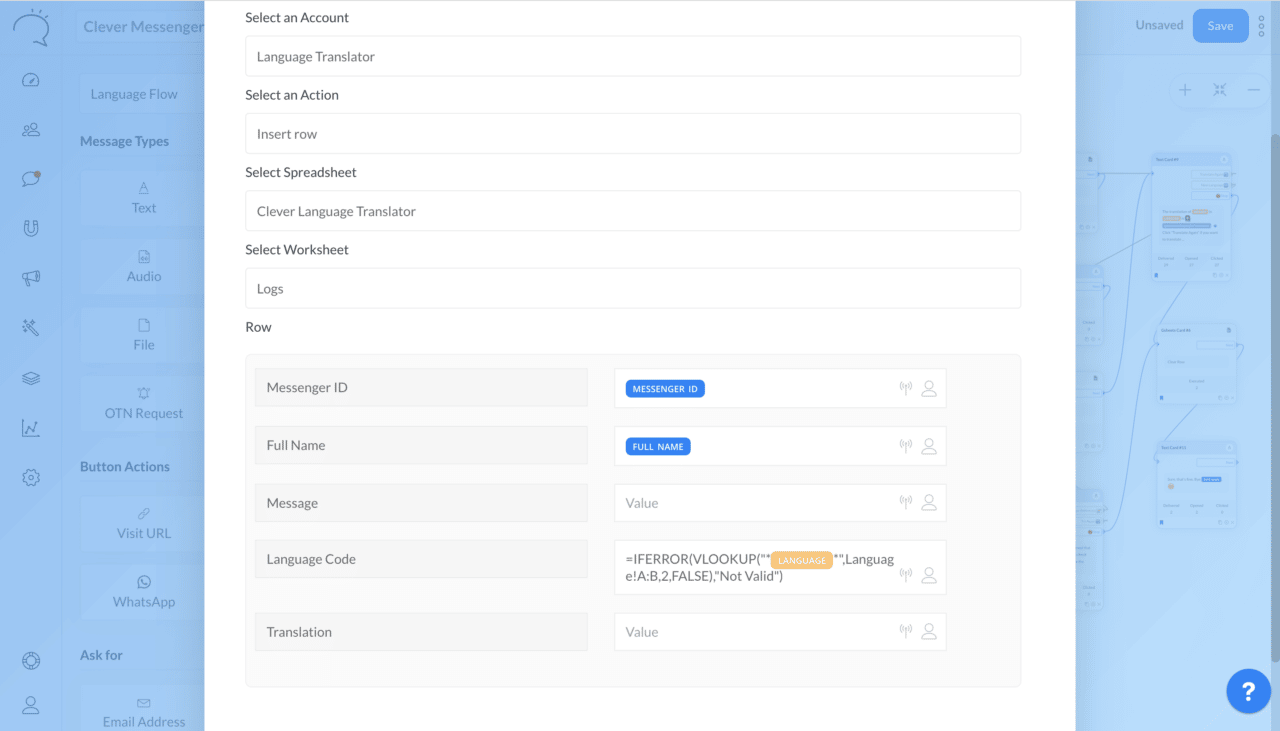
The first Google Sheet Card in the 3rd Column
Column 3 – Card 2
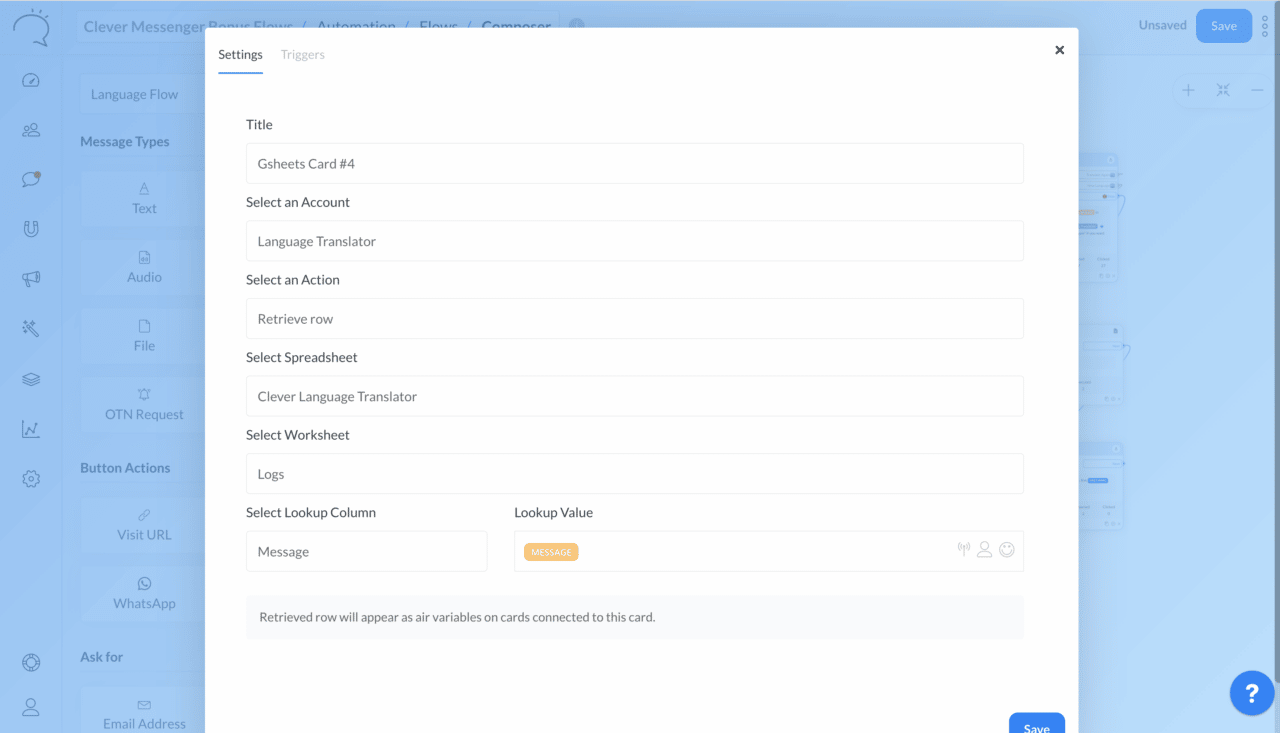
For the second Google Sheet card in the third column, make sure you select the Integrated Google Sheet account. Under “Select as Action”, choose “Retrieve Row”. Then, under “Select Spreadsheet” and “Select Worksheet”, make sure you select your spreadsheet you copied over earlier i.e. “Clever Language Translator”, and the worksheet “Logs”. Under Select Lookup Column, pick Messenger ID, and in the LookUp Value, you place the place holder Messenger ID, you do this by picking it from the picker.
Here’s how it should look like:
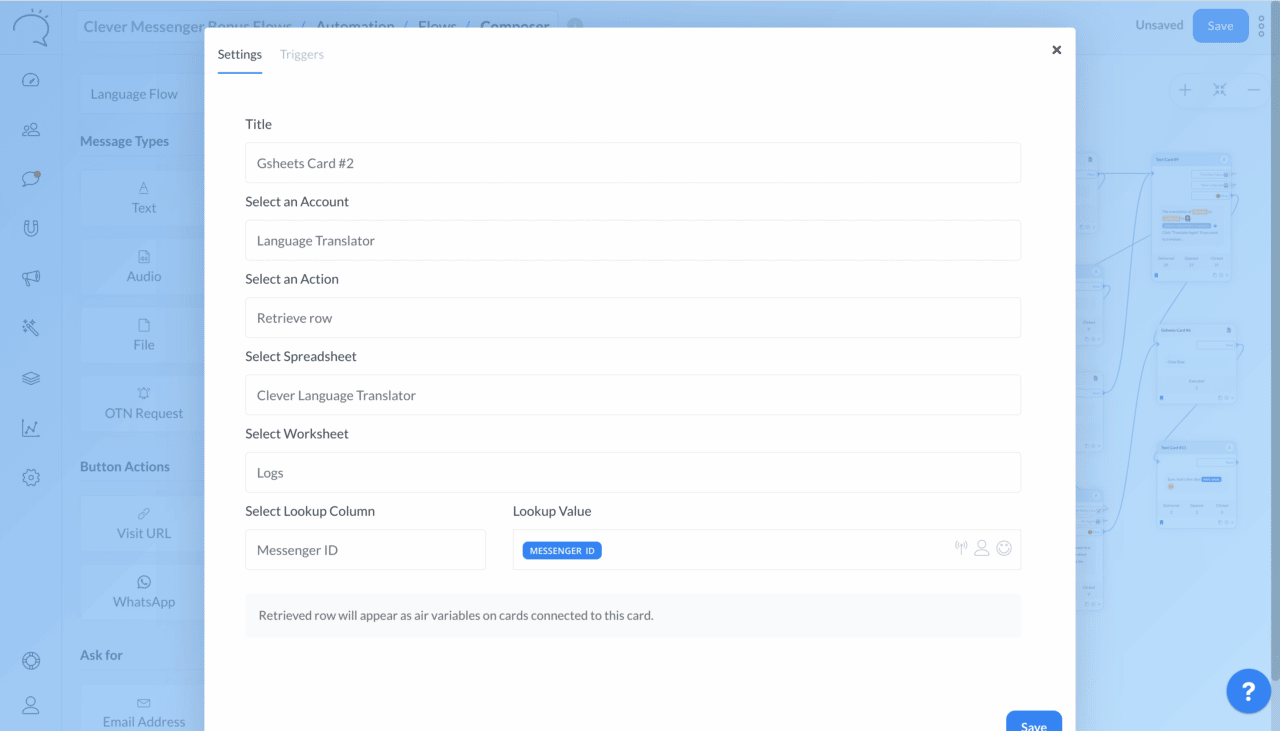
The second Google Sheet card in the second column.
Column 6 – Card 1
The sixth column has 2 Google Sheet cards as well. For the first card in the sixth column, make sure you select the Integrated Google Sheet account. Under “Select as Action”, choose “Update Row”. Then, under “Select Spreadsheet” and “Select Worksheet”, make sure you select your spreadsheet you copied over earlier i.e. “Clever Language Translator”, and the worksheet “Logs”. Under Select Lookup Column, pick Messenger ID, and in the LookUp Value, you place the place holder Messenger ID, you do this by picking it from the picker. Then, under Row, fill out the fields like we did as shown in the image below. Note, it has a formula as well: =GoogleTranslate(“MESSAGE“,”auto”,”VERIFY LANGUAGE“) – make sure that MESSAGE and VERIFY LANGUAGE ARE replaced by the Custom Fields with the same name. Also, note the little “lock icons”, make sure the right fields are locked and opened
Here’s how it should look like:
The first Google Sheet card in the sixth column.
Column 6 – Card 2
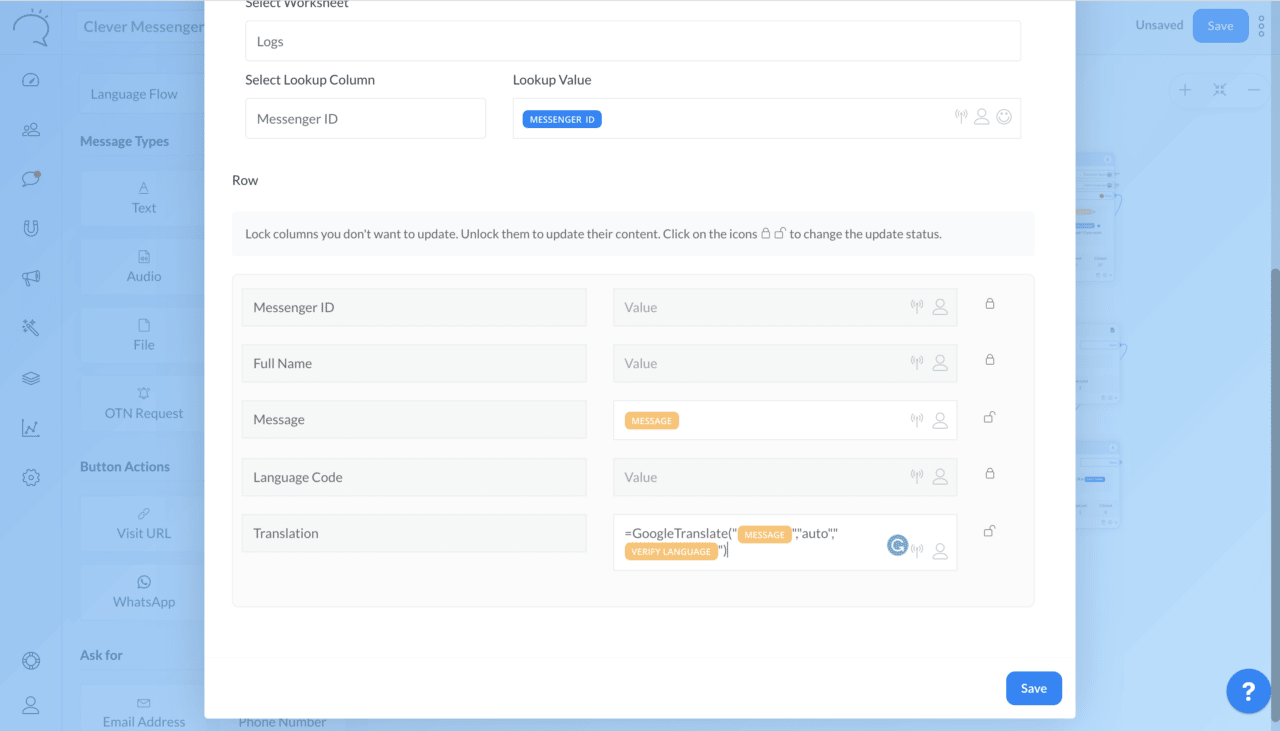
For the second Google Sheet card in the sixth column, make sure you select the Integrated Google Sheet account. Under “Select as Action”, choose “Retrieve Row”. Then, under “Select Spreadsheet” and “Select Worksheet”, make sure you select your spreadsheet you copied over earlier i.e. “Clever Language Translator”, and the worksheet “Logs”. Under Select Lookup Column, pick Message, and in the LookUp Value, you place the Custom Field called “Message”, you do this by picking it from the picker.
Here’s how it should look like:
The second Google Sheet card in the sixth column.
Column 7
Then, finally, in the last column, we find the last Google Sheet card. Here, make sure you select the Integrated Google Sheet account. Under “Select as Action”, choose “Clear Row”. Then, under “Select Spreadsheet” and “Select Worksheet”, make sure you select your spreadsheet you copied over earlier i.e. “Clever Language Translator”, and the worksheet “Logs”. Under Select Lookup Column, pick Messenger ID, and in the LookUp Value, you place the place holder Messenger ID, you do this by picking it from the picker.
Here’s how it should look like:
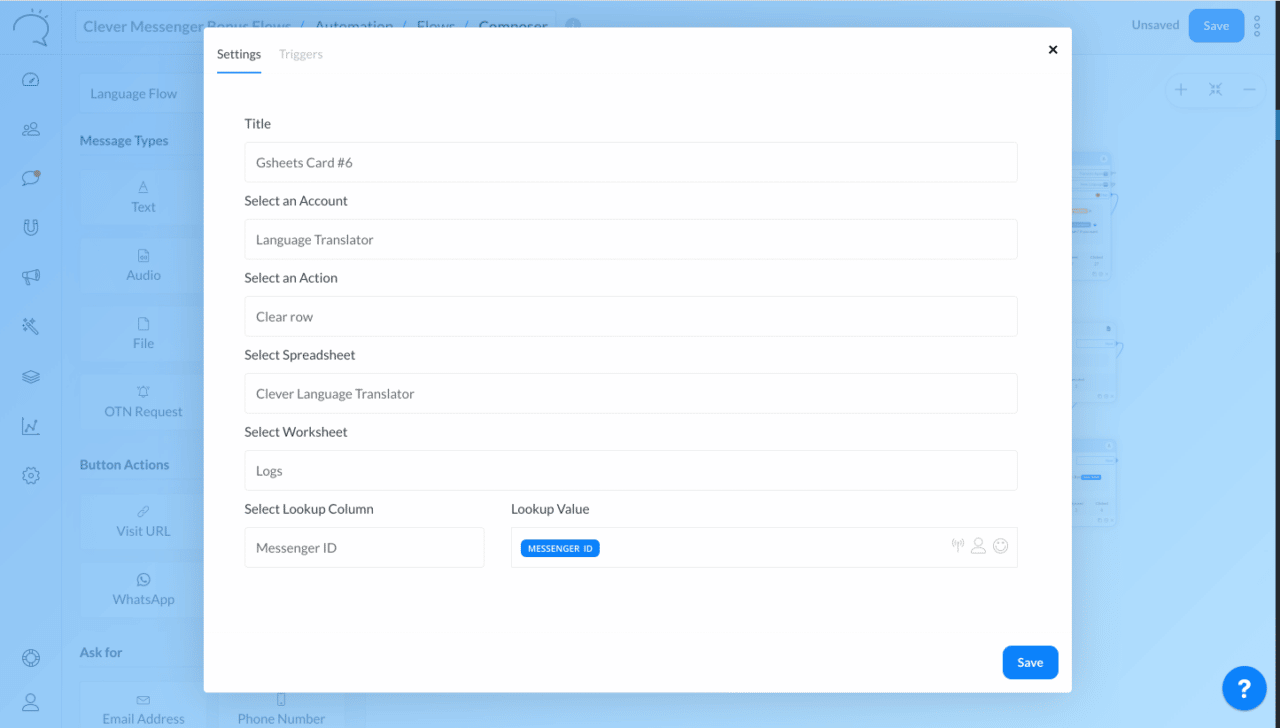
The first Google Sheet card in the seventh column.
How to Install a Premium Flow on Your Chatbot
Installing a Premium Chatbot Flow on your page is easy! Here are the steps:
Step 1: Inside Clepher, from Account Level, click through to the dashboard of the Page you’d like to add your Premium Flow to.
Step 1: Navigate to Page Level
Step 2: Once you landed on your desired Page (Page Level), navigate to Flows. You can find Flows under Automation (the magic wand icon).
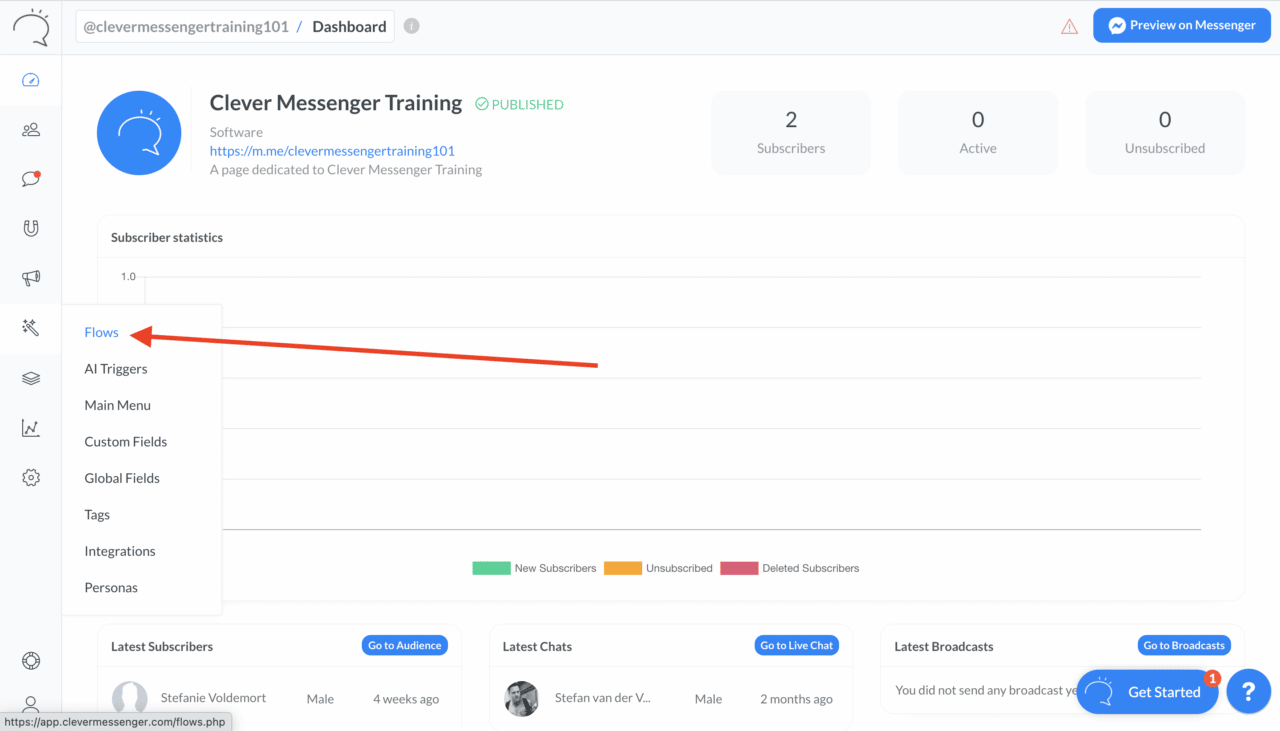
Step 2: Go To Flows
Step 3: Once on Flows, click “Create New” in the top right
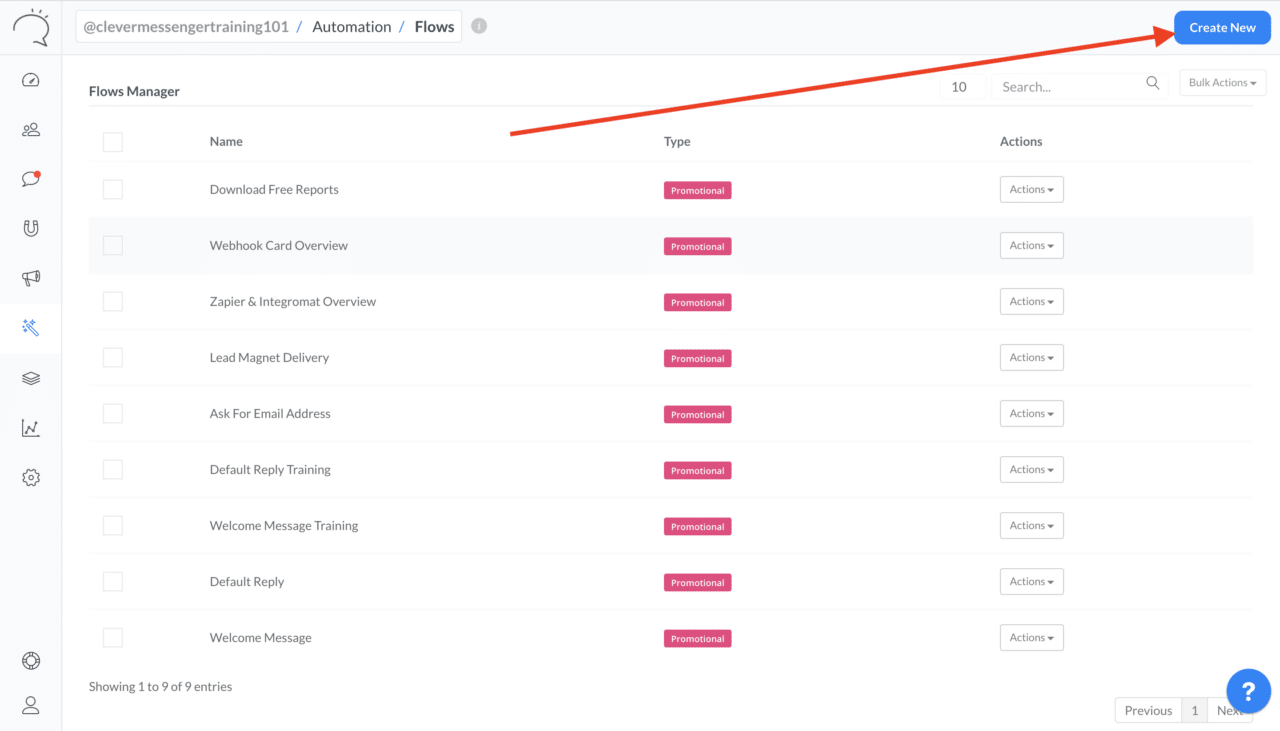
Step 3: Click “Create New” in the top right
Step 4: Name your new Flow. (i.e. “Premium Flow”.)
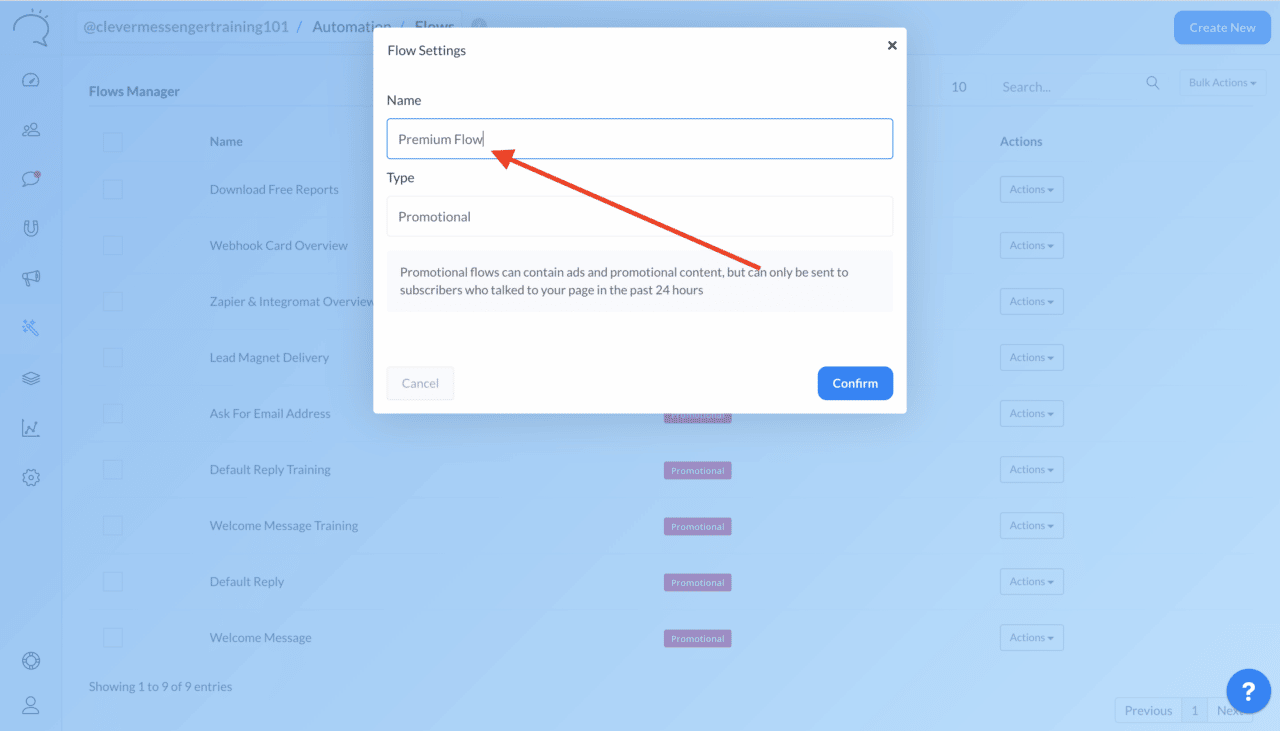
Step 4: Give your Flow a name
Step 5: Click “Confirm”. This redirects you to the Flow Composer.
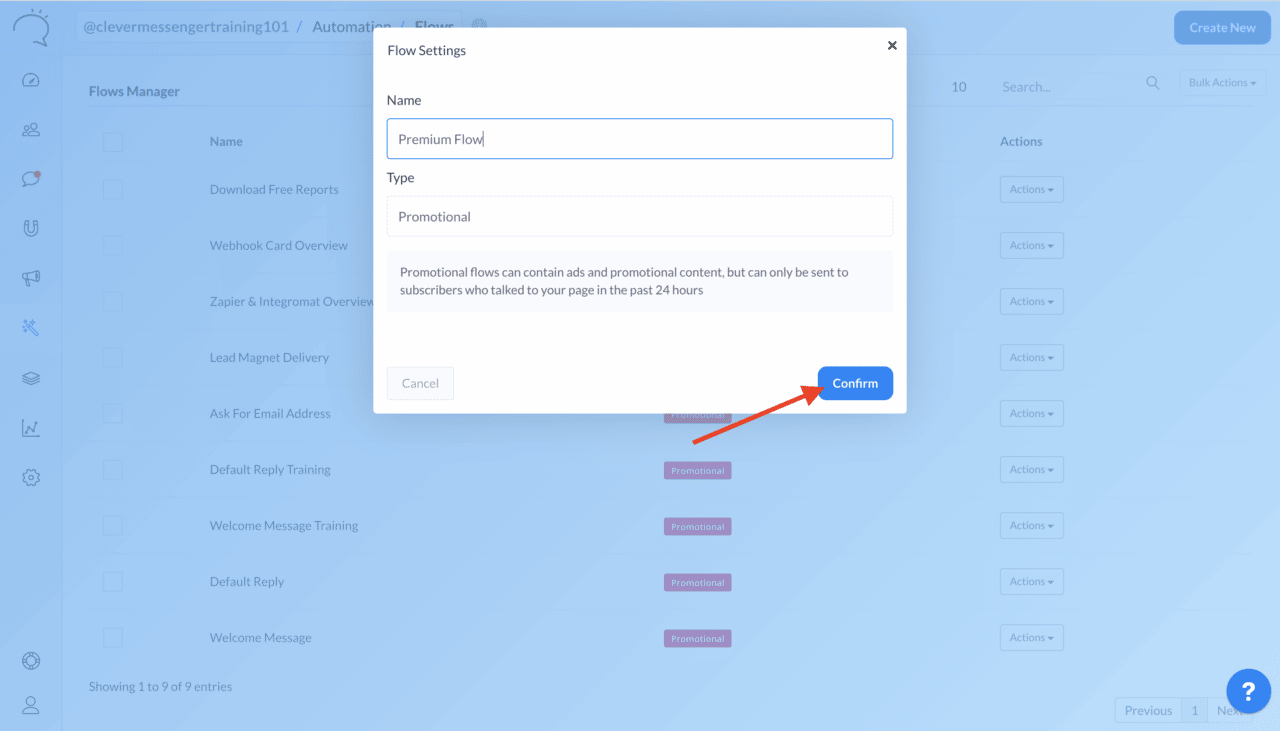
Step 5: Click Confirm
Step 6.1: Now, if you’re creating a new Flow, you’re asked if you want to “Build From Scratch”, or if you’d like to “Import a Flow”. Choose Import.
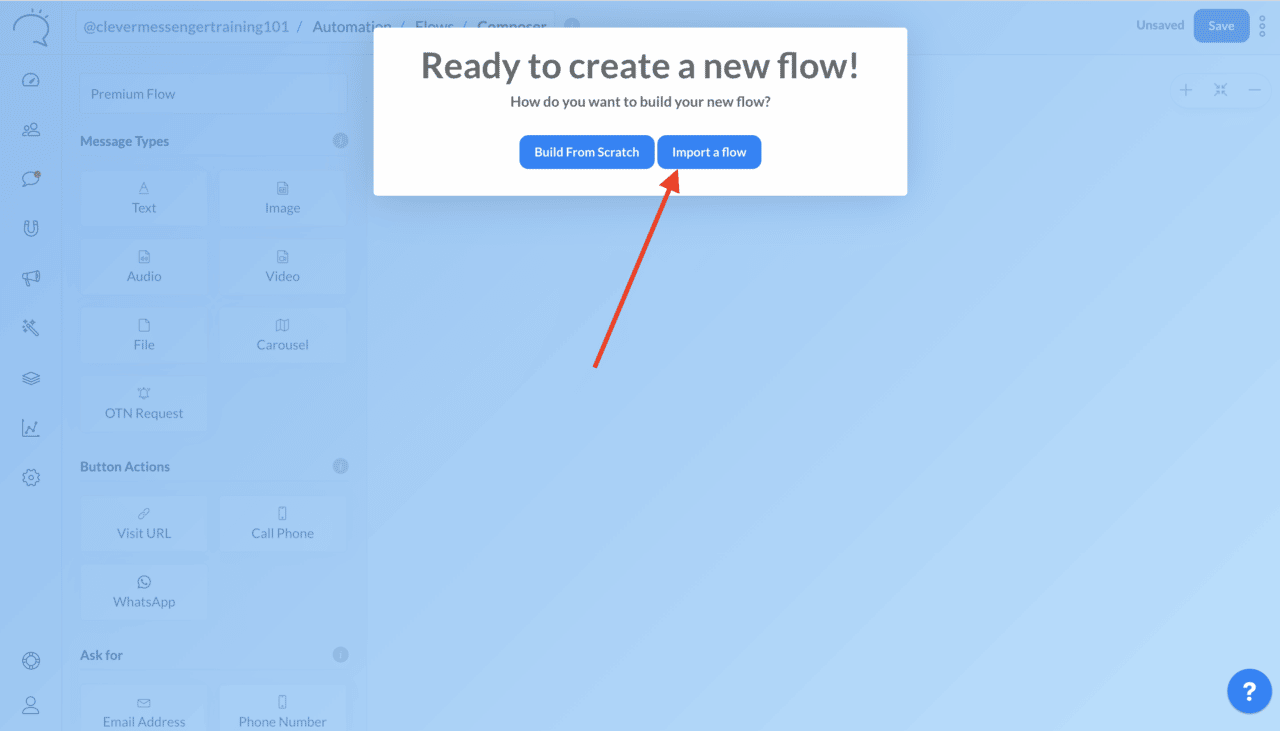
Step 6.2:
Alternatively, you can click on the 3 vertical aligned dots in the top right to navigate to the Import Flow section

Step 6.2: Alternate Way of Pulling the Import Menu
Step 7: Either way, this gives you a searchable list of all Flows you have available across your entire Clepher account. Yes, this means you can import Flows from other pages you own as well. But, it also shows all the current Premium Flows available to you.

Step 7: Choose a Premium Chatbot Flow
Step 8: Premium Flows are marked with a Premium Tag. Search for the word “Premium. Then simply select the Premium Flow you want to import on the page, and click “Import”.
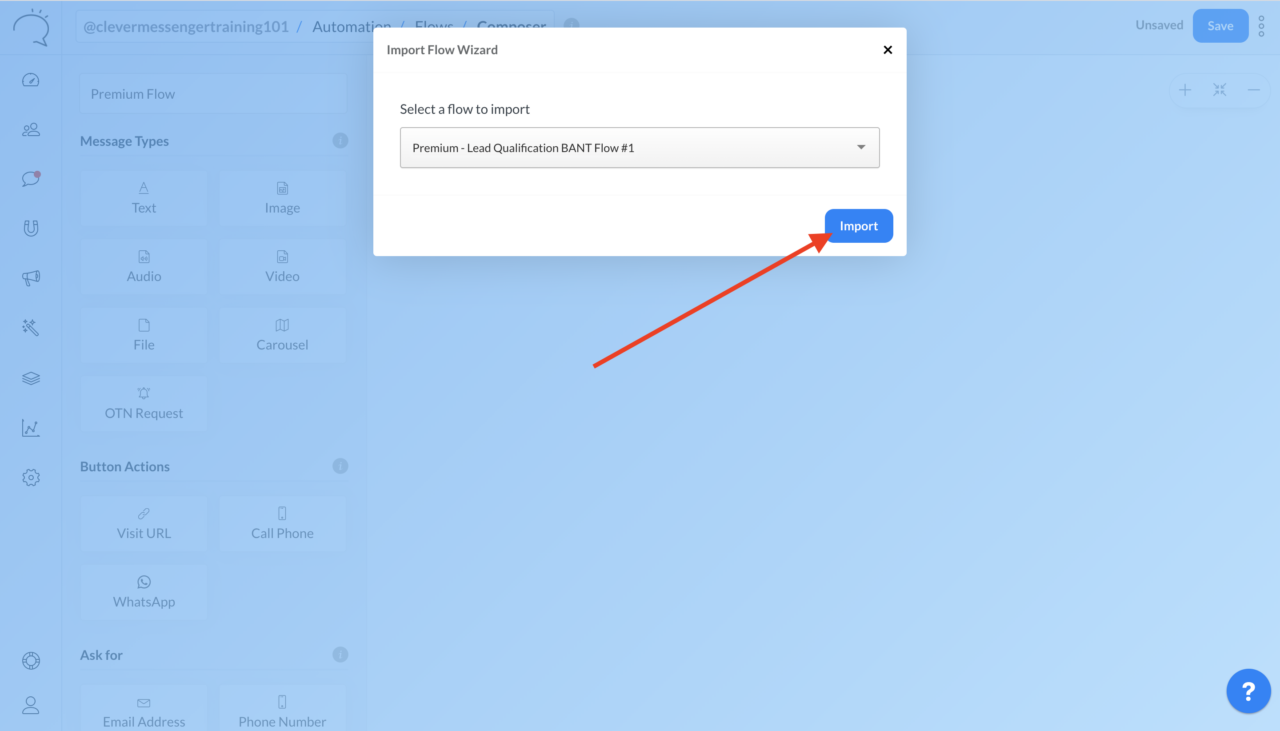
Step 8: Confirm to Import Premium Chatbot Flow
Premium Chatbot Flows
With well over 100 Premium Chatbot Flows created already, we thought it would be cool to create an overview as we did with Templates as well. So, that’s forthcoming as well as more Premium Flows that you’re able to import with just a single click!
Get Started Today
With Clepher, you can import this language translator chatbot flow with ease. Clepher is the world’s most reliable chatbot builder that helps you create your Messenger chatbot in an instant. The platform is simple to use, and customers call us the most intuitive platform out there on the market. That said, Clepher is managed by a hard-working team committed to evolve and improve the platform. With the ultimate goal of propelling your business to higher heights.
So, what are you waiting for? Get Started with Clepher today.
Related Posts
Step-by-Step Guide to Write Chatbot Scripts: Examples and Templates
April 20, 2024Top 8 AI Tools for Business (Tried and Tested!)
April 18, 2024Looking to Build a Bot Yourself? Learn to Automate Your Business!
April 16, 2024
Founder Clepher